
Although Inkscape is a 2D drawing application, it is quite capable of drawing photorealistic 3D images. To demonstrate this capability, in this article I show you, step-by-step how to draw a photorealistic sphere. Not only is it possible to draw photorealistic 3D with Inkscape, but it's also very easy - which is really saying something when you're talking about a vector graphics drawing application.
The reason Inkscape is so capable of drawing photorealistic 3D is because it's capable of rendering millions of shades of colors, with varying degrees of transparency, and complex linear and radial gradients. But to keep this example simple, we won't use any gradients. That's right, the image above was drawn without using radial gradients. I did, however, use blurs, which is very easy to do in Inkscape.
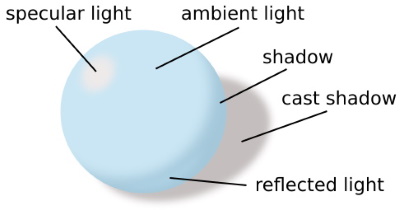
What makes a 2D drawing look 3D is the arrangement of light and shadow. Let's assume there is a lamp to our left and slightly behind us which creates a bright spot on the sphere. This is called specular light. The rest of the sphere is lighted by scattered and reflected light from around the room. This is called ambient light.
The lamp creates a shadow on the opposite side of the sphere and also causes the sphere to cast a shadow on the table top. Light reflected off the surface area of the table top creates an area of reflected light within the sphere's shadow.

To create the sphere, draw 3 circles, all about the same size, as shown above. For the first circle, set the Stroke style Width: to 0. Set the circle's Fill to the ambient color of the sphere. Set the Fill blur to about 7 percent.
For the second circle, set the Stroke style Width: to 0. Set the second circle's Fill to the color of the shadow side of the sphere. The Fill blur of the second circle should be left at 0 percent.

Raise the first circle to the top of the z-order and place it on top of the second circle as shown above. Then select both circles and group them (Object | Group).
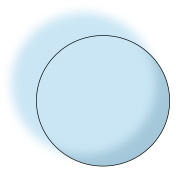
Raise the third circle to the top of the z-order. Set it's Stroke style Width: to 1 pixel (Stroke paint to black). Set it's Fill color to white (optional). Set Fill color alpha to 0 (transparent). The move it to a position directly over the second circle, as shown above.
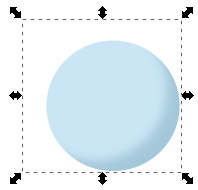
Then draw a selection box around all three circles. Select Object | Clip | Set in the menu, and magically, the unwanted part of the image disappears.

Draw a smaller ellipse to create the bright spot on the sphere. set its Stroke style Width: to 0. Set its Fill: to a brighter color than the circles. Set the fill's blur to 20 percent. Note that the positioning of the bright spot is critical. Use the sphere's shadow as a cue to where to place the bright spot

Use the Draw Bezier curves and straight lines tool to draw the shape of the reflected light area within the sphere's shadow area. Set the Stroke style Width: for the reflected area to 0. You'll want a lighter fill color, but not as light as the bright spot.

Lastly, draw an ellipse to create the sphere's cast shadow. Set the Stroke style Width: for the cast shadow to 0. The Fill: color of the cast shadow should be gray, or a darker shade of the table color.
And there you have it, a photorealistic drawing of a 3D object using a 2D graphics drawing application. You can use Inkscape to make a photorealistic drawing of any 3D object if you properly arrange the light and shadow.
More Graphics Design Tips:
• How to Make a Meme
• Inkscape Text Kerning
• How to Install the Free, Open-Source, Blender 3D Animation Application
• How to Create a Simple Video with Windows Movie Maker
• Drawing Text with Draw SVG
• Inscape Text in a Shape
• Tips For Hand Coding MathML
• Beginning GIMP: From Novice to Professional
• Inkscape - How to Use Bitmap Image Fill Pattern
• How to Make a Video Game for your Xbox for Free

