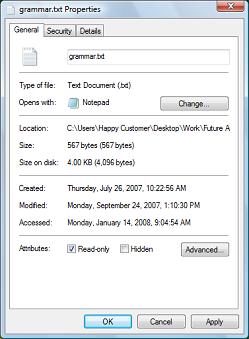
Write protecting a file prevents anyone, including you, from editing or accidentally deleting the file. Follow the steps below to write protect a file.
1. In Windows Explorer, navigate to the file and right-click on the file's name. In the popup menu that appears, select Properties.

2. In the file's Properties dialog box, on the General tab, at the bottom of the page, set the [x] read-only check box.
3. Click on the [OK] button.
More Windows Tips:
• Configure Your Keyboard's Typomatic Functions
• Create Your Own Custom Screen Saver with Windows Built-in Slideshow
• Diable Windows CD/DVD AutoPlay
• Save Ink When Printing
• Configure Recycle Bin to Immediately Delete Files
• Vista - Display Multiple Clocks on Your Desktop
• How to Change Your Computer's Name
• Disable Windows 7 Automatic Resizing and Docking
• Disable Windows 7 Wireless Configuration Manager Service (WLAN AutoConfig)
• How to Create a Microsoft Excel Database

