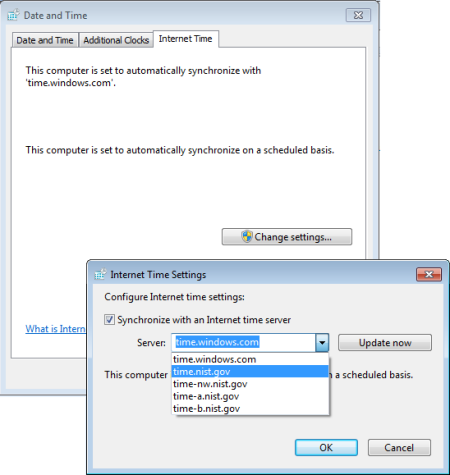
To ensure that the clock on your PC is accurate, you can synchronize it with an Internet Time Server.
1. In Control Panel, select the Clock, Language, and Region group. On the Clock, Language, and Region page, under Date and Time click on Set the date and time.
2. In the Date and Time dialog box that appears, click on the Internet Time tab.
3. On the Internet Time tab, click on the [Change settings...] button. If the User Account Control warning box appears, click on the [Yes] button.

4. In the Internet Time Settings dialog box that appears, in the Server: drop down list, choose an Internet Time Server. Then click on the [Update now] button.
Note: If your PC is in a domain, you can't synchronize it with an Internet time server, you need to synchronize it with the domain's network time server.
Actually, your PC should, by default, be configured to synchronize to time.windows.com every seven days. One of the reasons you might be thinking of synchronizing your PC's clock is because it doesn't keep accurate time. In that case, you might want to schedule a task to run the Date and Time utility at a more frequent interval. (In Control Panel's System and Security group, select Administrative Tools, then Task Scheduler).
If your PC's clock still does not keep accurate time, make sure the Windows Time service (w32time) is running. Another problem might be a bad CMOS battery on the motherboard, which causes the PC to lose time when it's turned off.
More Windows Administration Information:
• Create a Shortcut to Windows 10 Services Management Console
• Windows 2000 Security Overview
• Windows Server 2003 Active Directory and Network Infrastructure
• Free Tool to Uninstall Windows 10 Store Apps
• How to Harden a Server
• Windows PC Performance Troubleshooting and Optimisation
• For Quick Information About System - DOS Systeminfo Command
• How to Install Hyper-V on Windows Server 2019
• How to Restore Files From File History in Windows 10
• Uncomplicated AD Object Management on a Remote Server Domain

